Translate

Pokazywanie postów oznaczonych etykietą stepbystep. Pokaż wszystkie posty

23 lut 2018

Justyna Baczewska - Guest Designer

Witajcie ;)
To już mój ostatni post dla Scrapińca. Ten rok minął bardzo szybko, a możliwość współpracy była niesamowitą przygodą, za którą bardzo dziękuję ;)


Moją pracę zaczęłam od przygotowania materiałów: blejtramu, zdjęcia, papierów, kwiatów i kilku tekturkowych dodatków.
Kiedy już w głowie miałam ogólny zarys pomalowałam i postemplowałam tło,

przykleiłam tekturki, które je świetnie urozmaicają cudne gwiazdki i szwy,

Następnie przygotowałam kompozycję pod zdjęcie. Wykorzystałam stare strony z książki i kilka kawałków papieru

i całość przykleiłam na blejtram.

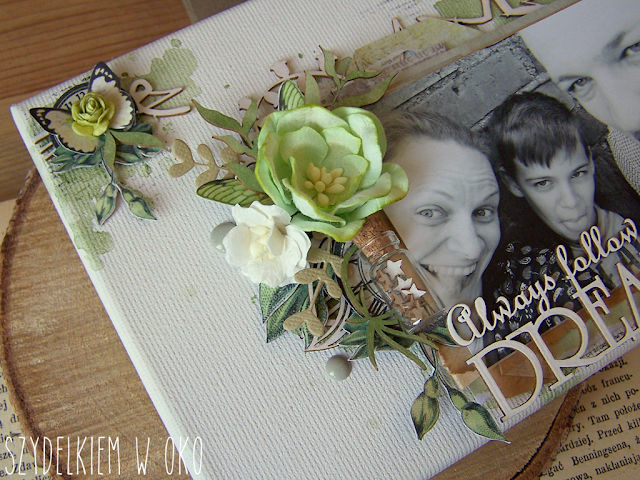
Teraz najfajniejsza zabawa -  ozdabianie. W kompozycję z lewej strony wplotłam konwaliowy bukiet,

gwiazdkowe confetti umieściłam w małej szklanej buteleczce,

część gałązek zabarwiłam rozcieńczoną farbą akrylową, którą wykorzystałam do tła - dzięki temu pasują idealnie

a napis ozdobiłam białym pudrem do embossingu.

Wszystkie dodatki prezentują się pięknie, pozostaje je tylko przykleić

i gotowe:)

Tak prezentuje się gotowa praca.


Miłego dnia
Justyna


Wykorzystałam:

19 sty 2018

Lea Biccelli - Guest Designer

First of all, a creative 2018 to all.
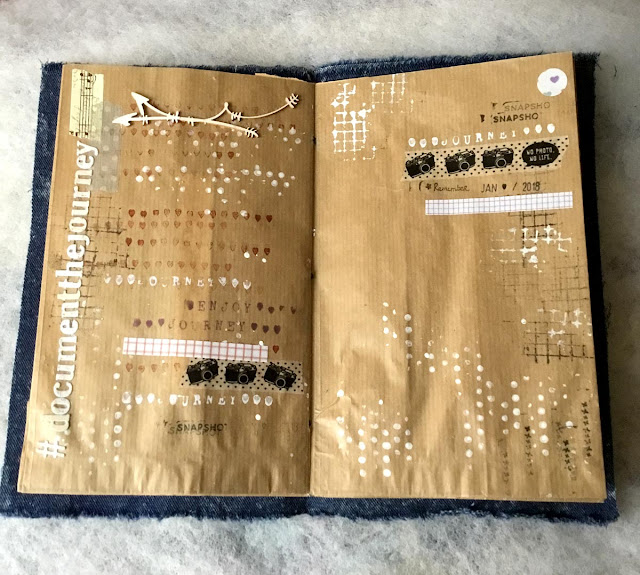
Like every year, the first days of January is the period when I can give myself a short trip together with some friends. This year the destination was Venice and I decided it would be fun to prepare a travel journal to stop the memories of this short vacation. My programs have undergone changes as I caught the flu, but as soon as possible I will enrich the album of the photos I managed to do.


1.I use 8 paper bags to create 4 double pages:in each bag i cut a strip from the open side to make it a little smaller.
2.3. To create the 4 double pages I cut 4 strips from the package paper and folded them in half.
4. For each bag, in one of the two sides where the paper is folded, I applied the double-sided tape.


5.6. I inserted each strip of package paper one half between the two flaps of a bag and the oher half between the flaps of another bag, so as to form a double page. And do I did for all the other pages.
7. For the cover, I take two pieces of fabric. In this case I use some denim.
8. I glued the two layers, wrong side to back, with gloss heavy gel medium.


9. once dry, I cut the cover slightly larger than the double page, open, of course.
10. Then I marked three points in the folding of the double page, one in the middle and the other two at 7 cm from the center. I then simply made  holes with the tip of the scissors through the pages and the cover to easily bind my album.


11. 12.To bind, in a very simple way, I used a long weaving needle. Leaving the thread a little long to facilitate the binding at the end,I insert the needle from the inside of the album, through the pages and the cover.
13.The needle, out of the central hole, must be passed through one of the two lateral free holes. Then you go through the cover and pages.Now the needle is back inside the album.
14. At this point the needle passes through the last free hole, through the pages and the cover.


15. Last step, the needle has come out from the side hole and to end it must be inserted in the central one passing then through the cover and the pages.
16.17.18. With the thread well pulled and in the middle of the two garments (beginning and end), we make a tight knot to ensure a perfect binding. Cut the excess.


19.20.The album is perfectly bound and firm on the cover. With all the pages ready to be decorated.


chipboards I used:


12 sty 2018

Christina Lampropoulou - Guest Designer - LO tutorial

Hi all
Today I would like to show you my tutorial:
First of all , I found the Scrapiniec chipboards and the photo I wanted to scrap .
 Then I started to make my backround. I used white gesso on the papers . As you can see , I stuck two papers together to have a heavier surface.
 After that I started with the colours... I used some purple mist. I love purple...
 Now , it 's time for some modeling paste and more colour... I used some gold as my second colour. Do be afraid to use different shades. When the decoration is done , everything will match together...
 My chippies were painted in white colour to add some brightness...

This time I chose to stuck the most of them at the backround ..
I used some mist over them , too.
As you can see, I used a lot of layers , papers and gause to add more interest on my page.
Now it 's time for fun!!!You just have to decorate... I used sisal , flowers and some 3D embellies .
I used some stickers ,too.
I always choose to use a pen for emphasise the edges of my papers...


You are free to use any embellishment you want...
At the end , don't forget to add some small splashes of white or black or any of your favourite colour!!!
Your mixed media LO is ready
 And some details ,too:


Materials used:
 Thank you so much for being here!
 Kisses